
How to Create Gallery Wall for Personalized Decor Success
Over half of American homeowners say their decor does not reflect their personality. Choosing the right pieces for a gallery wall can feel daunting when you want something meaningful and distinctive. If you are hoping to showcase your journey, mixing art styles and personal mementos opens up exciting options that transform blank walls into a true reflection of who you are.
Table of Contents
- Step 1: Choose Your Personalized Decor Pieces
- Step 2: Plan Your Gallery Wall Layout
- Step 3: Select The Perfect Wall Location
- Step 4: Arrange And Map Your Artwork
- Step 5: Hang And Adjust Each Piece
- Step 6: Review And Refine Your Display
Quick Summary
| Key Point | Explanation |
|---|---|
| 1. Choose meaningful artwork | Select decor pieces that reflect your personality and experiences, fostering emotional connections with each item. |
| 2. Plan layout before hanging | Create a mock layout on the floor with chosen pieces to visualize composition and spacing before installation. |
| 3. Select an optimal wall location | Position your gallery wall in a way that enhances visibility and interaction with existing room decor and lighting. |
| 4. Use templates for mapping | Create paper cut-outs to simulate your artwork’s dimensions, allowing for experimentation with arrangement without permanent marks. |
| 5. Review and refine display | After hanging, step back to assess balance and harmony, making small adjustments to enhance the overall aesthetic. |
Step 1: Choose your personalized decor pieces
Creating a gallery wall starts with thoughtfully selecting personalized decor pieces that tell your unique story. Your goal is to curate a collection that reflects your personality, experiences, and aesthetic preferences.
When selecting artwork, explore diverse categories that resonate with your style. Experts recommend considering photography, illustrations, abstract paintings, typography, and travel mementos to create visual depth and interest. Look for pieces that have personal meaning - perhaps photographs from memorable trips, artwork from local artists, or prints that capture significant moments in your life.
Focus on building a collection with varying sizes, textures, and frames to create visual complexity. Mix black and white photographs with colorful illustrations, or combine vintage and modern pieces to add dynamic energy to your wall. Pay attention to the emotional connection each piece provides, ensuring that when someone looks at your gallery wall, they see a curated narrative of your experiences.
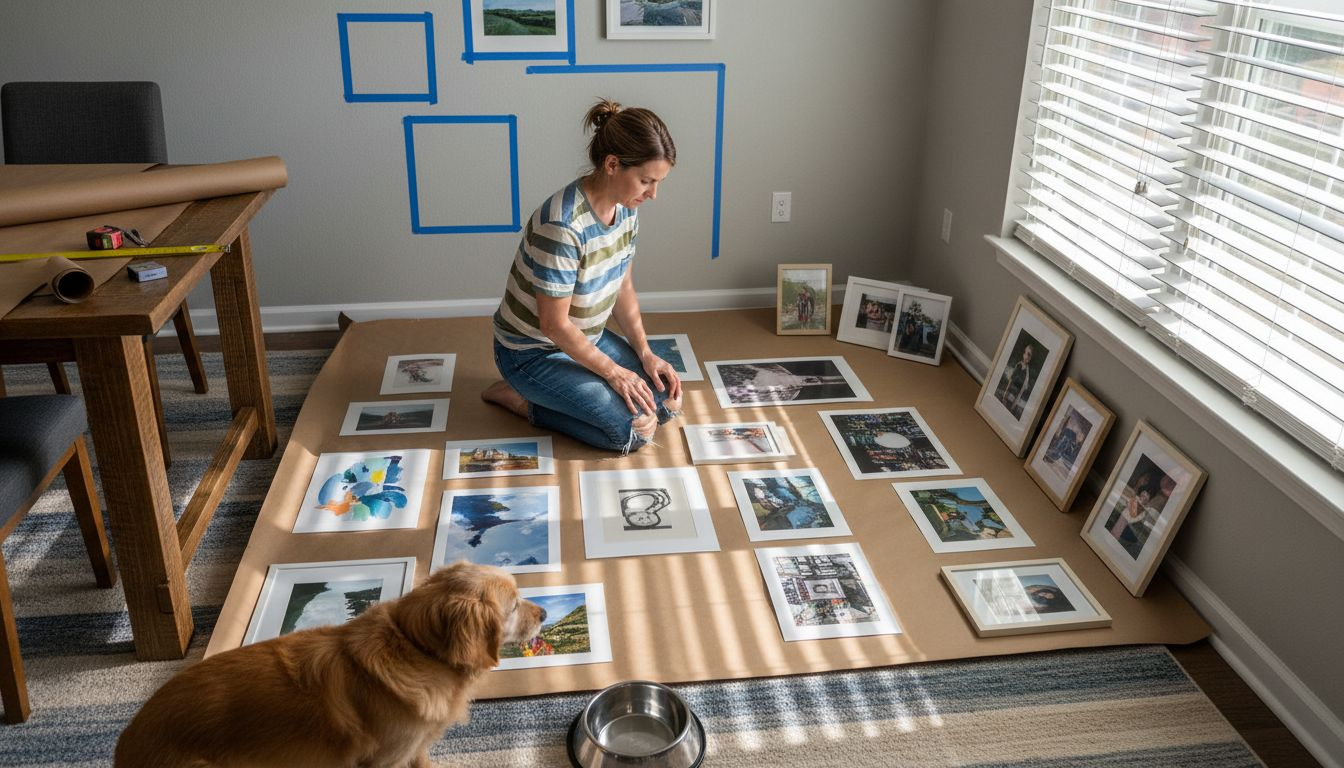
Pro tip: Start by laying out your chosen pieces on the floor first to experiment with arrangement and composition before committing to hanging them on the wall.
Here’s a quick overview of artwork types and the emotional impact they can add to your gallery wall:
| Artwork Type | Description | Emotional Impact |
|---|---|---|
| Photography | Captured moments, personal events | Nostalgia, personal story |
| Illustrations | Drawings, sketches, or cartoons | Whimsy, creativity |
| Abstract Paintings | Non-representational art | Energy, mood, interpretation |
| Typography | Quotes, words, meaningful text | Inspiration, personalization |
| Travel Mementos | Souvenirs, tickets, maps | Memories, adventure |
Step 2: Plan your gallery wall layout
Planning your gallery wall layout requires strategic thinking and creative visualization. Your goal is to transform a blank wall into a personalized storytelling canvas that reflects your unique aesthetic and memories.
Start by creating a comprehensive layout strategy for your wall decor that considers your available space and overall room design. Measure your wall carefully and use painter’s tape to outline the potential gallery area. This helps you visualize the potential composition and determine the maximum space you have for your artwork.
Consider creating a mock layout on the floor before hanging anything. Arrange your selected pieces on a large piece of kraft paper or directly on the floor, experimenting with different configurations. Play with spacing between frames balance piece sizes mix vertical and horizontal orientations. Some designers recommend leaving 2 to 3 inches between frames to create a cohesive yet dynamic visual experience. Remember that your gallery wall should feel intentional but not overly rigid experiment with asymmetrical layouts that add visual interest.
Pro tip: Take a photograph of your floor layout to use as a reference guide when you start hanging pieces on the wall.
Step 3: Select the perfect wall location
Selecting the ideal wall location is crucial for creating a stunning gallery wall that transforms your space and captures attention. Your chosen location will define the entire visual narrative of your personalized art collection.
Understanding wall coverage and optimal positioning is key to creating an impactful gallery display. Experts recommend covering approximately two-thirds to three-quarters of your designated wall space to create a balanced and visually engaging arrangement. The center of your gallery wall should typically be positioned around 57 to 60 inches from the floor this height ensures the artwork aligns naturally with eye level and becomes an immediate focal point in the room.
Consider the room’s overall layout and existing architectural features when selecting your wall. Look for spaces that naturally draw the eye such as areas above a sofa living room seating areas or in hallways with consistent lighting. Avoid walls with excessive furniture or competing visual elements that might detract from your gallery wall. Natural light can dramatically enhance your artwork so consider walls near windows or with consistent ambient lighting that will highlight your curated pieces without creating harsh shadows.
Pro tip: Use a laser level to help you accurately mark the center point of your gallery wall and maintain perfect alignment during installation.
Step 4: Arrange and map your artwork
Arranging and mapping your artwork is the creative heart of building a stunning gallery wall that tells your unique visual story. This step transforms your collection from individual pieces into a cohesive artistic statement.
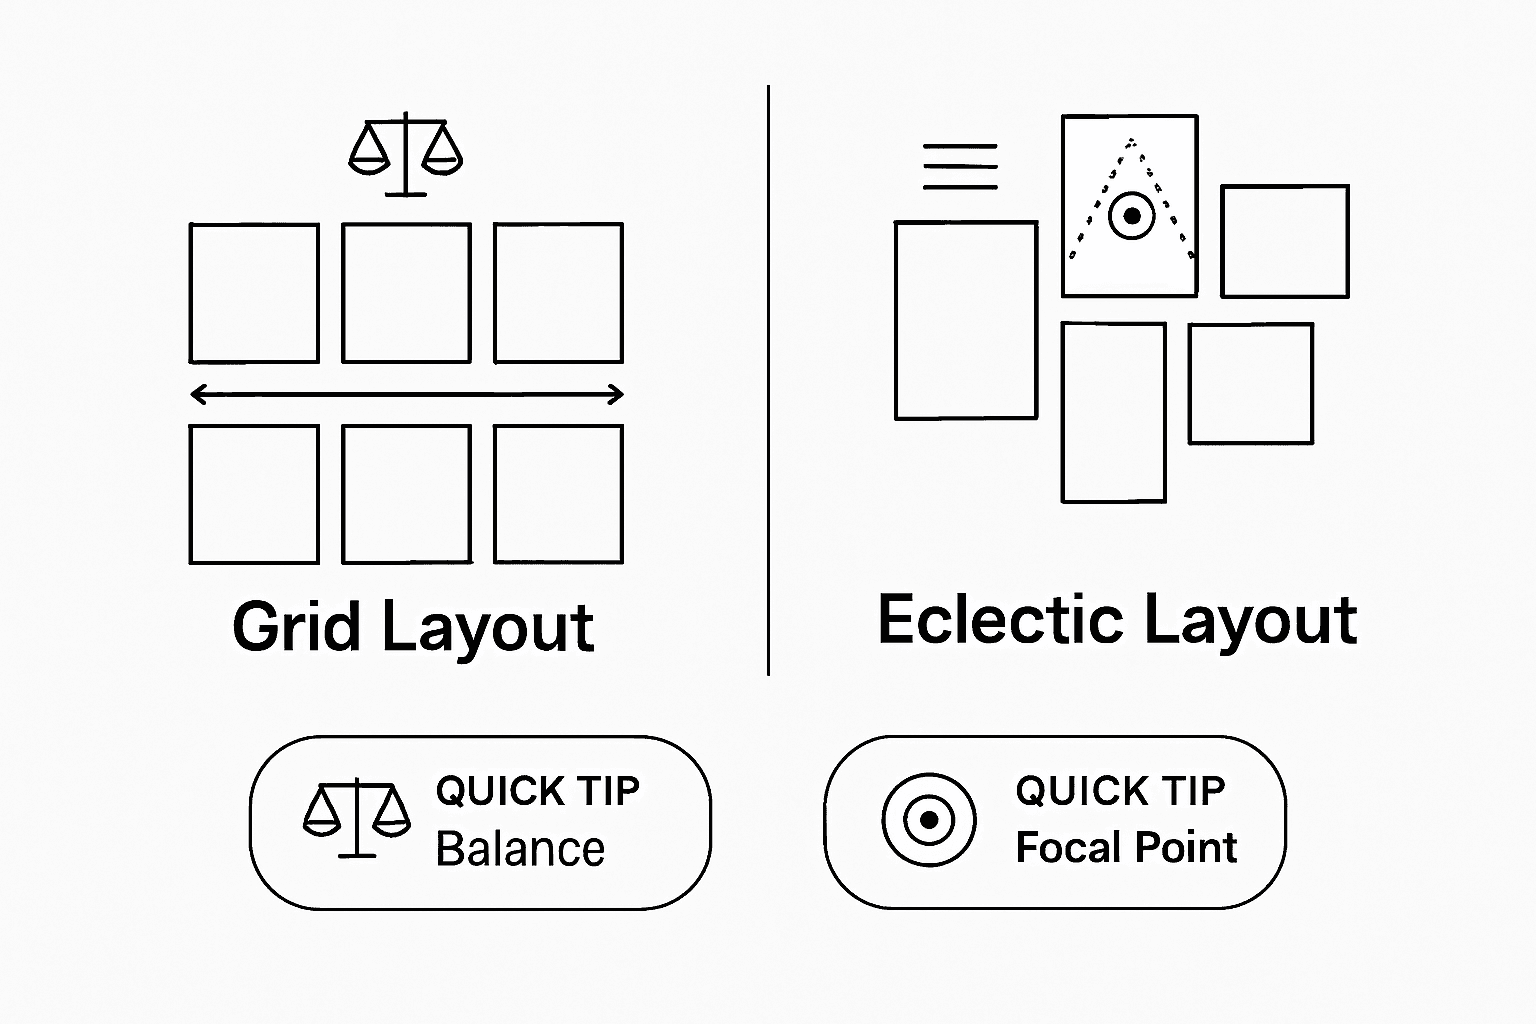
Mapping your gallery wall layout offers multiple strategic approaches to create visual harmony such as symmetrical grids square configurations or top aligned arrangements. Professional designers recommend using paper cut-outs matching your artwork dimensions to plan your layout directly on the wall. This technique allows you to experiment with different configurations without making permanent marks or multiple nail holes.
Start by tracing each frame onto kraft paper and cutting out precise templates. Arrange these paper cut-outs on the floor or directly on your selected wall surface experimenting with spacing balance and visual flow. Pay attention to the relationships between pieces consider alternating frame sizes mixing horizontal and vertical orientations and maintaining consistent spacing roughly 2 to 3 inches between artworks. Take a step back periodically to assess the overall composition ensuring the arrangement feels intentional yet organic. Your goal is to create a gallery wall that looks curated not cluttered.
Pro tip: Photograph your paper template layout before hanging to use as a precise reference during actual installation.
Compare popular gallery wall layout strategies to find what fits your space and style:
| Layout Strategy | Visual Effect | Best For |
|---|---|---|
| Symmetrical Grid | Clean, structured look | Modern or formal interiors |
| Square Configuration | Balanced, compact feel | Small areas or grouped frames |
| Top-Aligned | Anchored, cohesive row | Above furniture, casual settings |
| Asymmetrical | Dynamic, organic energy | Eclectic, creative personalities |
Step 5: Hang and adjust each piece
The moment of truth has arrived where your carefully planned gallery wall transforms from concept to reality. Hanging your artwork requires precision patience and a steady hand to bring your creative vision to life.
Professional designers recommend strategic techniques for hanging gallery wall pieces that ensure a polished professional look. Begin by marking precise hook locations using a pencil and carefully measuring the distance from your predetermined center point. Use a spirit level to guarantee each frame sits perfectly straight avoiding the common pitfall of slightly askew artwork that can disrupt your carefully planned composition.
Consider alternative hanging methods that protect your walls and provide flexibility. Instead of traditional nails picture hanging hooks or command strips offer less invasive options for mounting your artwork. Pay close attention to weight distribution ensuring heavier pieces have appropriate support and lighter frames are secured with appropriate hanging mechanisms. Take your time with placement making small adjustments as needed step back frequently to assess the overall visual balance. Remember that perfection comes from careful attention to detail subtle shifts can dramatically improve the final appearance of your gallery wall.
Pro tip: Keep a small hammer level and pencil within easy reach during installation to make real time adjustments and ensure precise positioning.
Step 6: Review and refine your display
Your gallery wall is nearly complete creating a personalized artistic statement that reflects your unique style and memories. This final review stage ensures your display looks intentional polished and visually compelling.
Take a comprehensive step back and observe your gallery wall from multiple angles and distances. Examine how the pieces interact with natural light throughout different times of day and how they complement your existing room decor. Personalized wall art requires thoughtful curation to create a harmonious visual narrative that tells your individual story. Look for subtle imbalances in color tone frame spacing or overall composition that might need minor adjustments.
Be willing to make small refinements that elevate your gallery wall from good to extraordinary. Slight shifts in frame positioning subtle rotations or adding or removing a single piece can dramatically transform the entire display. Consider photographing your gallery wall and viewing the image on your phone or computer this provides an objective perspective that helps identify areas needing fine tuning. Pay attention to negative space balance color flow and how each piece contributes to the overall visual narrative.
Pro tip: Periodically rotate one or two pieces to keep your gallery wall feeling fresh and dynamic reflecting your evolving personal style.
Elevate Your Gallery Wall with Personalized Art That Tells Your Story
Designing a captivating gallery wall requires more than just arranging frames it calls for pieces that deeply resonate with your personal memories and style. If you struggle with creating a cohesive narrative or finding artwork that speaks to your unique journey explore our Personalized Canvas Wall Art Prints collection. These custom prints offer meaningful personalization options including names, dates, and messages that transform your space into a heartfelt gallery.

Start crafting a truly memorable gallery wall today with high-quality, American-made decor from FunLifeNow. Don’t wait to make your home a vibrant reflection of your life story. Visit us now to discover a variety of one-of-a-kind personalized canvas prints and Personalized Directional Sign Canvas Prints that perfectly complement your creative vision. Take the next step in your personalized decor journey and bring your gallery wall to life with pieces designed to inspire and connect.
Frequently Asked Questions
How do I choose the right decor pieces for my gallery wall?
Selecting the right decor pieces involves picking artwork that resonates with your personality and experiences. Start by considering various types of artwork like photography, illustrations, and travel mementos that tell your unique story.
What layout should I use for my gallery wall?
The layout of your gallery wall can vary based on your style. Consider experimenting with symmetrical grids or asymmetrical designs to find what best fits your space, ensuring to leave about 2 to 3 inches between pieces for a cohesive look.
How do I decide the best location for my gallery wall?
Choose a location that draws the eye and receives good lighting, covering about two-thirds of the wall space. Avoid walls with competing elements to ensure that your gallery wall becomes a focal point in the room.
What is the best way to hang my artwork?
Hang your artwork by marking precise hook locations and using a spirit level to keep frames straight. Take your time to adjust and ensure each piece is displayed perfectly, revisiting the gallery wall multiple times for minor tweaks.
How can I refine and enhance my gallery wall after installation?
To refine your gallery wall, step back and assess how the pieces work together from different angles. Make small adjustments to improve balance and flow, such as rotating artwork or altering frame spacing for a more polished appearance.
How often should I update my gallery wall?
Periodically updating your gallery wall can keep it feeling fresh and dynamic. Consider rotating one or two pieces every few months to reflect your evolving style and experiences.
Recommended
- Creating a Gallery Wall: Step-by-Step Guide for Personal Touch – FunLifeNow
- Creating a Gallery Wall: Step-by-Step Guide for Personal Touch – FunLifeNow
- How to Display Wall Art for Stunning Personalized Decor – FunLifeNow
- How to Display Wall Art for Stunning Personalized Decor – FunLifeNow
- Spegelns funktion i walk in closet | Stiligt