
Displaying custom wall art: a 2026 guide for unique decor
Transforming your home with personalized wall art creates meaningful spaces that tell your unique story. Yet many homeowners struggle to arrange custom pieces in ways that enhance both visual appeal and emotional connection. Whether you’re showcasing family memories on canvas or gifting a personalized acrylic print, the right display strategy makes all the difference. This guide walks you through planning, arranging, and perfecting your custom wall art presentation to create gallery-worthy displays that resonate with your personal style and bring warmth to every room.
Table of Contents
- Essential Tools And Preparation For Displaying Custom Wall Art
- Choosing And Planning Your Custom Wall Art Layout
- Executing The Display: Hanging Methods And Creative Ideas For Custom Art
- Verifying Your Display And Avoiding Common Mistakes
- Discover Unique Custom Wall Art At FunLifeNow
- Frequently Asked Questions About Displaying Custom Wall Art
Key takeaways
| Point | Details |
|---|---|
| Layout styles impact emotion | Symmetrical grids create calm formality while asymmetrical arrangements tell dynamic personal stories |
| Planning tools ensure balance | Digital auto-layout apps use algorithms to visualize arrangements before you commit to hanging |
| Flexible display methods add versatility | Ledges and leaning prints allow easy swapping and gifting without wall damage |
| Less is more prevents clutter | Curated selections with proper spacing create elegant displays that avoid overwhelming your space |
Essential tools and preparation for displaying custom wall art
Before you hang your first piece, gather the right tools to ensure professional results. You’ll need a quality level, measuring tape, pencil for marking, appropriate wall hooks or anchors based on your wall type, and a hammer or drill. For heavier custom canvas or acrylic prints, invest in sturdy picture hanging wire and D-rings rated for the weight.
Digital planning transforms guesswork into precision. Digital planners use Monte Carlo algorithms to create balanced arrangements, letting you test countless configurations before making a single nail hole. Apps like GalleryPlanner, Artfully Walls, and even simple photo editing tools help you visualize spacing, scale, and color harmony against your actual wall dimensions.
| Tool/App | Key Features | Best For | Price Range | | — | — | | GalleryPlanner | Auto-layout algorithms, room visualization | Complex multi-piece arrangements | Free to $15 | | Artfully Walls | Drag and drop interface, print templates | Quick visual planning | Free | | Photo editing apps | Basic layout mockups, color matching | Simple 2-3 piece displays | Free to $10 | | Physical paper templates | Tactile testing, no tech needed | Hands-on planners | Free (DIY) |
Follow these preparation steps for smooth installation:
- Measure your wall space accurately, noting obstacles like light switches and outlets
- Photograph the wall in different lighting conditions to assess color and shadow patterns
- Create paper templates of each piece at actual size to test arrangements physically
- Mark the center point of your display area as an anchor for balanced placement
- Consider future additions by leaving expansion room in your initial layout
Pro Tip: Measure twice, mark once. Take photos of your template arrangement on the wall before removing them, so you have a reference guide during actual hanging. This simple step prevents frustrating do-overs and ensures your vision translates perfectly from plan to reality. For more detailed guidance on wall art arrangement tips, explore proven spacing formulas and visual balance techniques.
Choosing and planning your custom wall art layout
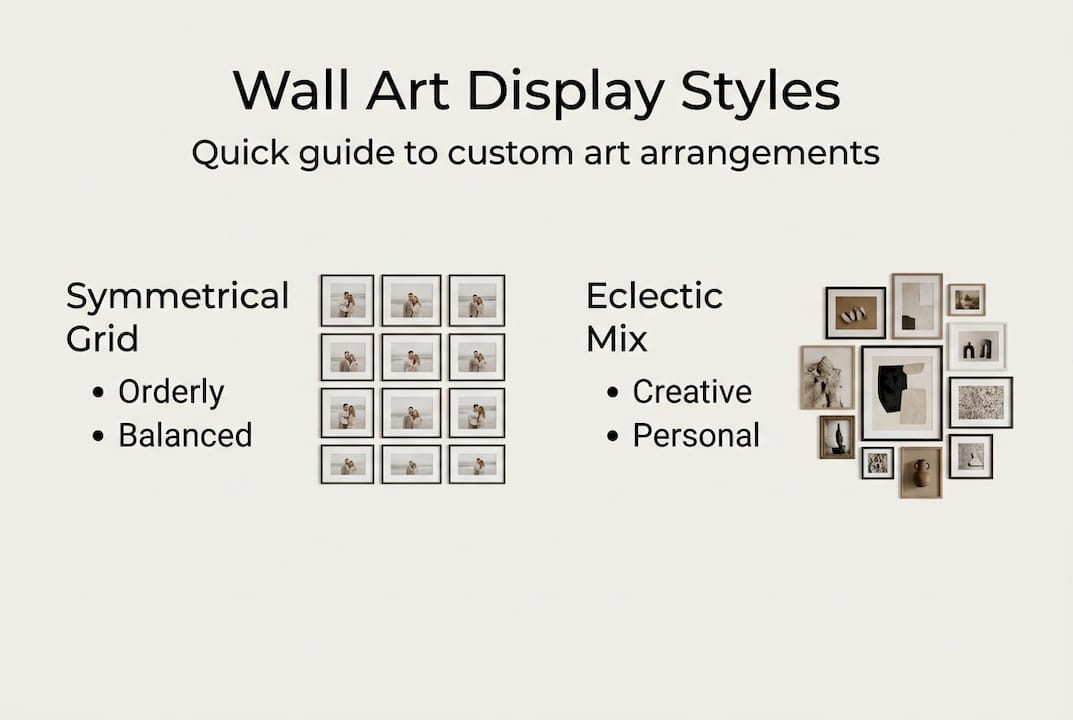
Your layout choice shapes the entire emotional atmosphere of your space. Two primary styles dominate custom wall art displays, each serving distinct aesthetic and storytelling purposes.
| Layout Style | Emotional Effect | Best Room Types | Pros | Cons |
|---|---|---|---|---|
| Symmetrical Grid | Calm, organized, modern | Living rooms, offices, formal dining | Easy to plan, timeless appeal, professional look | Can feel rigid, less personal storytelling |
| Asymmetrical Salon | Dynamic, eclectic, personal | Bedrooms, hallways, creative spaces | Showcases personality, flexible sizing, conversation starter | Requires more planning, risk of clutter |
Symmetrical grids suit formal spaces while asymmetrical arrangements excel at telling dynamic personal stories. However, design experts caution that overdone galleries quickly look cluttered. The key lies in restraint and intentional curation.
When selecting your layout style, consider these critical factors:
- Room function and existing decor style determine which approach feels natural
- Personal meaning behind each piece guides whether storytelling or uniformity takes priority
- Scale relationships between pieces affect visual weight and balance
- Wall dimensions and architectural features like windows or doors constrain arrangement options
- Lighting sources create shadows and highlights that enhance or detract from your display
A less is more philosophy prevents the overwhelming effect of too many competing elements. Start with three to five pieces for your first custom wall art display. This manageable number lets you master spacing and visual flow before expanding to larger collections.
Test your chosen layout before committing. Use painter’s tape to outline each frame position on the wall, then live with the arrangement for a day or two. View it from different angles, in various lighting conditions, and ask yourself whether it creates the emotional response you desire. Digital mockups help, but nothing beats seeing actual scale on your wall. For comprehensive gallery wall step-by-step guidance, explore detailed tutorials covering spacing formulas and visual weight distribution.
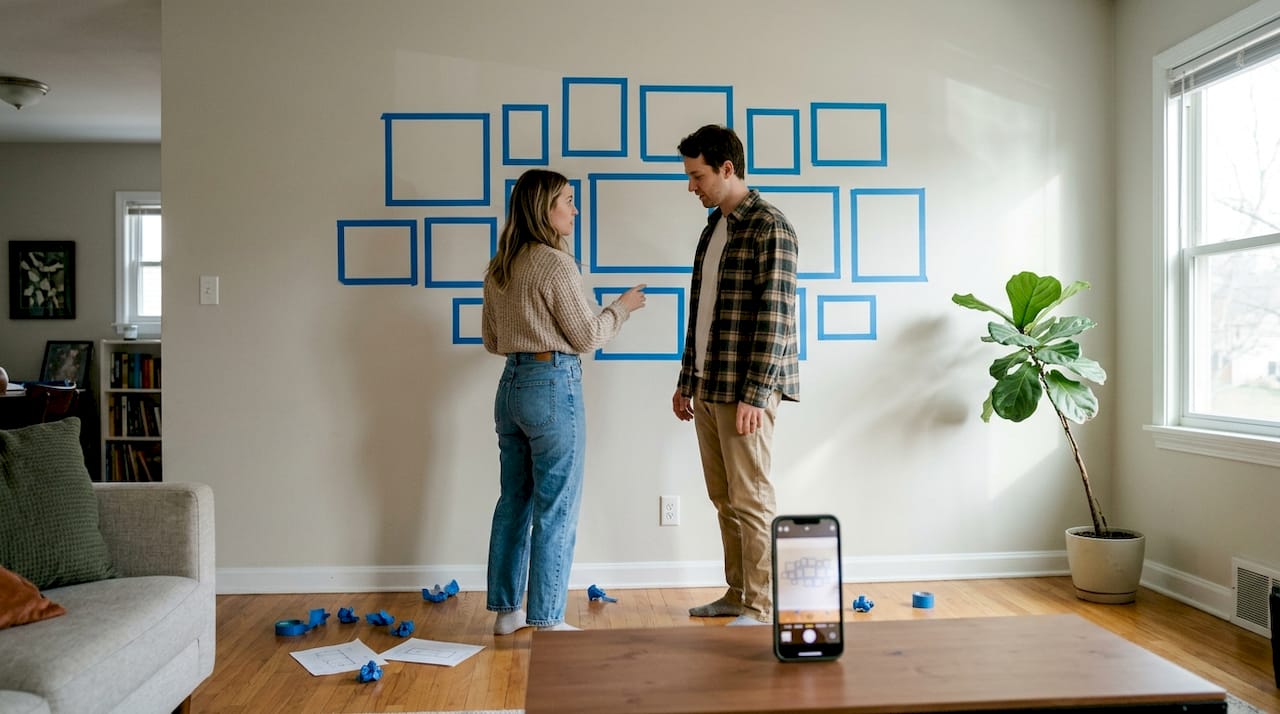
Pro Tip: Photograph your taped outline arrangement and convert the image to black and white. This removes color distractions and reveals whether your spacing and scale relationships create true visual balance. If the black and white version looks awkward, adjust before hanging.
Executing the display: hanging methods and creative ideas for custom art
Once you’ve planned your perfect layout, proper execution brings your vision to life. Follow these steps for secure, level hanging:
- Mark the center point of your display area using a level and pencil
- Install the center piece first as your anchor, ensuring it’s perfectly level
- Work outward from the center, maintaining consistent spacing between pieces
- Use a level to check each piece both horizontally and in relation to adjacent frames
- Step back frequently to assess overall balance and make micro-adjustments before finalizing
- Secure all hanging hardware tightly, especially for heavier canvas or acrylic pieces
Custom canvas and acrylic prints offer exceptional durability and visual depth for personalized decor. Canvas provides texture and traditional gallery appeal, while acrylic delivers modern clarity with light-reflecting properties that make colors pop. Both materials work beautifully for custom family photos, meaningful quotes, or artistic designs that tell your story.
Beyond traditional hanging, creative display methods add versatility:
- Picture ledges create flexible galleries where you can easily swap pieces seasonally or as your story evolves
- Leaning oversized prints against walls delivers casual elegance perfect for bedrooms and reading nooks
- Mixed media mounts combine canvas, metal signs, and dimensional objects for textured storytelling
- Layering smaller pieces in front of larger backgrounds adds depth and visual interest
- Easel displays showcase single statement pieces as focal points without wall commitment
- Clip systems with wire or ribbon allow quick changes ideal for renters or gift recipients
For gift shoppers, these flexible methods prove invaluable. Recipients can immediately enjoy leaning or ledge displays without tools, then transition to permanent hanging when ready. This removes barriers and ensures your thoughtful personalized gift gets displayed right away rather than stored in a closet.
Pro Tip: Use removable adhesive strips rated for your piece’s weight when renting or frequently changing displays. Modern options hold securely yet remove cleanly, protecting walls while offering full creative freedom. Compare canvas prints versus posters to understand material benefits for different display methods and longevity expectations.
Verifying your display and avoiding common mistakes
Even carefully planned displays benefit from critical evaluation and refinement. Common mistakes undermine otherwise beautiful arrangements:
- Overcrowding pieces with insufficient breathing room creates visual chaos
- Poor alignment where pieces aren’t level or consistently spaced looks amateurish
- Ignoring wall color and lighting that clash with or wash out your custom art
- Hanging too high where the center sits above natural eye level
- Mismatched frame styles that compete rather than complement
- Neglecting the negative space that gives each piece room to shine
Verify your completed display systematically:
- View from the room’s main entry point where visitors first see the wall
- Check from typical seating positions to ensure comfortable viewing angles
- Assess in morning, afternoon, and evening light to catch shadow or glare issues
- Measure spacing between pieces to confirm consistency matches your plan
- Evaluate emotional impact by asking whether the display tells your intended story
- Photograph the arrangement to identify subtle misalignments invisible to the naked eye
- Make minor adjustments to level, spacing, or positioning based on your assessment
Design experts emphasize restraint in gallery walls:
Some experts warn overdone galleries look cluttered. Focus on less is more by curating your most meaningful pieces rather than filling every inch of wall space. Quality and intention trump quantity every time.
Seek honest feedback from family or friends with good design sense. Fresh eyes catch issues you’ve become blind to after hours of planning. Live with your display for at least a week before considering it final. You might discover that a piece needs repositioning or that adding one more element would perfect the composition.
Adjust lighting to complement your custom wall art. Picture lights, track lighting, or even strategically placed table lamps eliminate shadows and enhance colors. Consider the interplay between natural and artificial light throughout the day. Add decorative accessories like plants, shelves with meaningful objects, or complementary wall colors that frame your display without competing for attention. For advanced gallery wall personalization tips, explore color coordination strategies and thematic curation approaches that maximize emotional resonance.
Discover unique custom wall art at FunLifeNow
Ready to bring your wall art vision to life with pieces that truly reflect your story? FunLifeNow specializes in personalized canvas prints, acrylic wall art, and custom home decor designed to create emotional connections in every room. Each piece combines American craftsmanship with your unique personalization, from family names and meaningful dates to custom designs that capture your most cherished memories.
Explore our complete collection of customizable wall art options, discover inspiring gallery wall ideas, and access helpful decorating guides that make creating your perfect display effortless. Visit FunLifeNow today to design custom pieces that transform your house into a home filled with meaning, beauty, and your personal touch.
Frequently asked questions about displaying custom wall art
How to choose the right size for custom wall art?
Select sizes based on wall dimensions and viewing distance. For walls above sofas or beds, choose pieces spanning two-thirds to three-quarters of the furniture width. Larger rooms accommodate oversized statement pieces, while smaller spaces benefit from medium prints or curated multi-piece arrangements that avoid overwhelming the area.
What’s the best way to arrange mixed sizes and styles?
Start with your largest piece as the visual anchor, then build around it with smaller complementary elements. Maintain consistent spacing between all pieces, typically 2 to 3 inches for cohesive gallery walls. Balance visual weight by distributing larger, darker, or busier pieces evenly rather than clustering them in one area.
Can I display custom art without damaging walls?
Absolutely. Use removable adhesive strips rated for your artwork’s weight, picture ledges that require minimal hardware, or leaning displays that need no wall attachment. These methods work perfectly for renters or anyone who enjoys frequently refreshing their decor without permanent commitment or wall damage.
How often should I update or refresh my wall art display?
Refresh seasonally or when your story evolves. Many homeowners swap pieces quarterly to reflect changing seasons, holidays, or family milestones. Others maintain core pieces year-round while rotating smaller accent elements. Let your personal story and design preferences guide the frequency, ensuring your display always feels current and meaningful.
What spacing works best between custom wall art pieces?
Maintain 2 to 3 inches between frames for standard gallery walls. Tighter spacing creates a cohesive unified look, while wider gaps emphasize individual pieces. For salon-style arrangements with varied sizes, keep spacing visually consistent even if exact measurements vary slightly to accommodate different frame dimensions.
How do I prevent custom canvas from warping over time?
Hang canvas away from direct sunlight, heating vents, and high-humidity areas like bathrooms. Quality stretched canvas with proper wooden frames resists warping naturally. Ensure adequate air circulation behind the piece by using appropriate hanging hardware that keeps it slightly away from the wall rather than flush against it.